You’ve just set a long render or simulation study going, and now that your computer is locked up calculating all those 0’s and 1’s, there’s nothing to do but go and get a coffee.
Not so fast. If you’ve got a multi-core machine, you can use Windows Task Manager (in all versions of Windows) to free up one of the cores for other programs, allowing you to check emails, surf the web, watch YouTube, etc. The trade-off is that your render/simulation will take longer to solve – the more cores you have, the less this will matter.
- After your Simulation study/render is started, start Task Manager by pressing CTRL+ALT+DEL, or Start >> Run >> “taskmgr” (without the quotes).
- Click on the Processes tab and sort by Name – this tab shows all of the processes running in the background on your machine.
- For rendering, find PV360.exe, for Simulation, find Star.exe (this is after meshing, when the study has started solving)
- RMB on the process >> Set Affinity...
- Uncheck one of the CPU cores – it doesn’t matter which one.
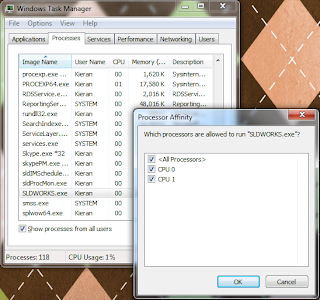
This stops Windows from assigning work from that process to that CPU core. It’s only temporary, so if you start another render, you will need to go through the above steps again.
Alternatively, you can change the priority of a process:
- (From step 4 above) RMB >> Set Priority >> set to Below Normal or Low
Changing the priority lower means that instructions being sent from PV360 to the CPU are solved after instructions sent from other processes such as your web browser. After doing this, your computer should function as normally expected, and the render will continue in the background.
You can change priority or affinity at any time while a process is running – this is handled by Windows in the background and won’t affect your render or simulation study.
The benefit of changing priority over setting affinity is that if you’re only using 3% of the available CPU power to check the web, 97% is devoted to finishing the render. If the CPU is quad-core, and we set the PV360 affinity to only 3 cores, it would only be using 75% of the full CPU processing power, regardless of what we are doing.
However, setting affinity ensures you have spare processing power, and often, even if you set the priority of a processor-hungry process like PV360 to Low, you may notice some performance issues trying to do other tasks (you’d be surprised how much processing is required to run YouTube in your browser), so I generally prefer to set affinity.
As a final alternative, if it they can wait, you can use SolidWorks Task Scheduler to schedule renders and studies to run when you aren’t using the computer – e.g. at night. This will be covered in another post.
PhotoView 360 uses HDR Environment images to create photorealistic renders. This video explains what these images are, and why they are the default method for lighting scenes in PhotView 360.These HDR Environment images can be broken down into two components:- The Environment, which is a 360degree panorama of a scene, which is reflected by the model you are rendering.
- The High Dynamic Range (HDR) image format, which captures more information per pixel than a standard image file, which provides PhotoView 360 with accurate lighting information for the scene
The panorama can be stitched together from a number of ordinary photographs, and the HDR image can be created by combining multiple exposures of the same image – both techniques can be done in image editing software such as Adobe Photoshop.You can find all of the default PhotoView 360 HDR Environment images and backgrounds under [Program Files]\SolidWorks Corp\SolidWorks\data\Images\textures\background, where [Program Files] is your default Windows Program Files directory.While the Basic scenes provide a range of generic photo studio environment images that create clean-looking renders, if you want to create interesting reflections, or an “in-context” shot of your product sitting in front of a realistic scene, you should consider using a custom Environment image that matches the model – e.g. a model of a car should use a road or car park scene, not a kitchen scene.There are a huge number of resources on the internet for HDR Environment images that cover as many different scenes as you can imagine, most of which you can use in PhotoView 360:Free HDR resources (not all products listed may be free):
HDR resources that you must buy to use:HDR Light Studio is a program for generating custom HDR images of photographic studio set ups:You can find many more HDR Environment image resources, plus detailed instructions for creating your own, simply by searching online.Once you have your custom HDR Environment image downloaded, you can load it in PhotoView 360 through Display Manager tab >> RMB Scene >> Edit Scene >> Environment >> Browse... to the image location. Then rotate it to suit the model, adjust the floor options, alter the brightness and if you add any SolidWorks lights, you can save the whole shebang as a custom scene file for later use under the Advanced tab in Edit Scene.Happy rendering!


