You’ve just set a long render or simulation study going, and now that your computer is locked up calculating all those 0’s and 1’s, there’s nothing to do but go and get a coffee.
Not so fast. If you’ve got a multi-core machine, you can use Windows Task Manager (in all versions of Windows) to free up one of the cores for other programs, allowing you to check emails, surf the web, watch YouTube, etc. The trade-off is that your render/simulation will take longer to solve – the more cores you have, the less this will matter.
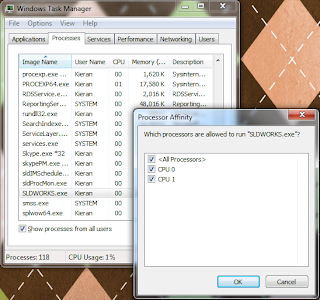
- After your Simulation study/render is started, start Task Manager by pressing CTRL+ALT+DEL, or Start >> Run >> “taskmgr” (without the quotes).
- Click on the Processes tab and sort by Name – this tab shows all of the processes running in the background on your machine.
- For rendering, find PV360.exe, for Simulation, find Star.exe (this is after meshing, when the study has started solving)
- RMB on the process >> Set Affinity...
- Uncheck one of the CPU cores – it doesn’t matter which one.
This stops Windows from assigning work from that process to that CPU core. It’s only temporary, so if you start another render, you will need to go through the above steps again.
Alternatively, you can change the priority of a process:
- (From step 4 above) RMB >> Set Priority >> set to Below Normal or Low
Changing the priority lower means that instructions being sent from PV360 to the CPU are solved after instructions sent from other processes such as your web browser. After doing this, your computer should function as normally expected, and the render will continue in the background.
You can change priority or affinity at any time while a process is running – this is handled by Windows in the background and won’t affect your render or simulation study.
The benefit of changing priority over setting affinity is that if you’re only using 3% of the available CPU power to check the web, 97% is devoted to finishing the render. If the CPU is quad-core, and we set the PV360 affinity to only 3 cores, it would only be using 75% of the full CPU processing power, regardless of what we are doing.
However, setting affinity ensures you have spare processing power, and often, even if you set the priority of a processor-hungry process like PV360 to Low, you may notice some performance issues trying to do other tasks (you’d be surprised how much processing is required to run YouTube in your browser), so I generally prefer to set affinity.
As a final alternative, if it they can wait, you can use SolidWorks Task Scheduler to schedule renders and studies to run when you aren’t using the computer – e.g. at night. This will be covered in another post.
If you’re setting up a new computer for SolidWorks, here are some recommendations that may save a lot of hassle in future if you experience any problems. Disc cloning tools create “snapshots” that you can use to revert to at the first sign of trouble. Wikipedia maintains a list of disc cloning software: If you already have your computer set up, and it’s running nicely, you can also make use of disc cloning software to create a restore point for your system.Firstly, create a Windows partition using disc partitioning software. This partition should contain Windows and Program files only. All data (SolidWorks files, documents, music, videos, etc.) should be saved to a separate partition. This ensures that if Windows or any programs become corrupt, you can format the Windows partition without affecting your data. With a fresh install of Windows 7 requiring upwards of 6Gb, plus space for installation of programs (SolidWorks can require up to approx. 7Gb) and the inevitable Windows growth (my current C:\Windows directory is a tad over 20Gb), you should make sure the partition is a minimum of around 40Gb. Thankfully, HDD space is cheap these days.After the disc is partitioned, install Windows. Once done, create a series of disc “images” using the disc cloning software:- A fresh Windows install (with latest updates applied, basic drivers, etc.). No user settings or extra software installed.
- All of the above, plus applying user settings, network settings, software (Office, Outlook, etc.). No SolidWorks.
- Above, plus SolidWorks, but with no SolidWorks user settings applied.
You can then set up SolidWorks as you wish and save the settings using the SolidWorks Copy Settings Wizard. These settings should be redone from scratch for each major release (i.e. when upgrading from SW2010 to SW2011) to ensure your SolidWorks registry does not become corrupted.While heavily compressed, these image files will still be quite large. I would suggest keeping the clean SolidWorks image on your machine for quick access, but also copying all of the images to an external HDD and keeping it off-site for safety.It is OK to uninstall and upgrade SolidWorks normally, rather than reverting back to the previous image. The idea of the images is to provide various levels of a "clean slate" should there be any particularly stubborn or unresolvable computer issues. MAKE SURE YOU TRANSFER YOUR SOLIDWORKS LICENSE OFF YOUR MACHINE BEFORE REVERTING TO AN EARLIER IMAGEIt is still a good idea to “rebuild” your machine from the first, clean Windows image on a semi-regular basis, to ensure a continued smooth operation of Windows and SolidWorks. After each rebuild, make sure you create new images of your Windows partition as per the above steps.
How much is your SolidWorks data worth to your business? Chances are it has a significant worth, and this is why backing up that data to insure against loss is so important. Let’s begin by looking at SolidWorks backup options.
Tools >> Options >> System Preferences tab >> Backup/Recover
 You can see a screenshot of my suggested backup options above.
Auto-recover
I have this turned off for a number of reasons:
- It gives you a false sense of safety, and means you are less likely to save often
- In the past, it has caused “Failed to save” errors
- It only recovers data if SolidWorks crashes a certain way – not if it freezes, etc.
- The auto-recover data often cannot be opened directly if SolidWorks crashes and does not provide the recover option
- It can save files at inopportune times (in parts with long rebuild times)
Be aware that SolidWorks is working to address these issues, so this recommendation may change in future.
Backup
This feature saves a copy of your files to the specified location every time you save your files (File >> Save or CTRL+S).
Each save will create a new version of the file, up to the number specified – e.g. if number of copies is 5, after saving a file 5 times, the first backup is overwritten. This provides a series of rolling revisions, and means that if you accidentally save a file but then wish to undo some changes, you can recover the previous version (you may need to sort out some file reference issues in doing so).
Change your backup directory to something you can remember and access easily (i.e. not the default directory). If your normal SolidWorks data is saved locally, consider setting the backup directory on a network file server, or vice versa. If you don’t have this option, set the backup directory to save to a different HDD to your normal data drive, in case one drive fails.
I would recommend setting the number of backups to between 3 and 5. You can also clear out files older than a certain time period - I’d suggest between 7 and 30 days. In both cases, the values you choose will be a trade off between the ability to revert back to older files, and HDD space limitations.
Save Notification
The Save Notification option provides a notification in the bottom right corner of SolidWorks after either a time period or a certain number of changes. I prefer the changes option as I often leave SolidWorks open while working on other things. Make sure you get into the habit of saving when you see the notification pop up!
Backing up your data
Once these options are set, you need to consider your data backup plan. Rather than ask how often you should backup, ask yourself (or your boss) how much data they are willing to lose. If you backup once a week, in a worst-case scenario you may have to redo a week’s worth of work.
If you save files to a file server, and the server is maintained by IT staff, the data should already be backed up. You should check how often this happens, and occasionally verify the backed up files are OK – there are endless IT horror stories of “bulletproof” backup plans that failed because, for example, a certain piece of hardware had failed 6 months ago and nobody realised.
If you maintain your own file server, or only save data on your local machine, make sure you have a schedule for regular backups – most backup software can automate this. You can find a comparison of backup software here.
Ideally you should then keep a copy of the latest backup on-site for easy access, plus off-site copies of previous backups, should your office go up in smoke, or your laptop get stolen, etc. In this regard, online backup services can take the hassle out of remembering to take backup media (DVD’s, tapes or HDD’s) home with you every night.
When upgrading a major version of SolidWorks, we recommend uninstalling previous SolidWorks versions to ensure there are no conflicts. SolidWorks uses the Windows registry to store settings and other information, and these registry entries should also be removed after uninstalling. SolidWorks automatically regenerates any necessary registry entries, using default values, when the program is opened.As of SolidWorks 2011, there is an option in the Installation Manager (IM) to cleanly uninstall SolidWorks, which has been one of the most popular Enhancement Requests in recent years.Before you begin, make sure you have transferred your license off the computer!In XP:Start Menu >> Control Panel >> Add/Remove Programs >> RMB on SolidWorks 2011>> UninstallIn Vista/Win7Start Menu >> Control Panel >> Programs and Features >> RMB SolidWorks 2011>> UninstallOnce the SolidWorks IM has started, RMB on the Title Bar >> select Total Uninstall Then proceed through the IM process (just keep clicking next) to uninstall. This will uninstall SolidWorks, and also remove the Windows Registry keys under HKEY_CURRENT_USER\Software\SolidWorksAlthough these are NOT the only registry entries and files installed by SolidWorks, it’s enough to ensure that your new installation won’t have any conflicts with holdovers from previous installations.If you’re looking for a more thorough list of registry keys and files to remove, or if you’re uninstalling an older version of SolidWorks, check out this document by Greg Jankowski of SolidWorks Corp., which covers the full list of files and registry keys created by SolidWorks, as well as the creation of a batch file to automate the cleaning up process.The document is an older version of the one you can find here on the SolidWorks forums.


