

This is a brief overview of Solidworks drawing views and the associativity between parts, assemblies and their drawings.
Popular Posts
-
 Disney cars Disney Cars Saly Filmore Disney Cars coloring pages wallpaper Lightning Mcqueen Ramone disney cars poster
 -
 2013 Cars Model, 2013 car, photo mercedes, car dekho, car electric, new cars, new vehicle, cost of cars...
 -
 Red And Black Ferrari Car Red Ferrari Car Wallpaper Yellow Ferrari Car Picture Latest Model Ferrari Car Pink Ferrari Car Wallpaper
Showing posts with label 3D CAD. Show all posts
Showing posts with label 3D CAD. Show all posts
Tuesday, February 28, 2012
Thursday, February 16, 2012
How to submit an Enhancement Request for SolidWorks
This is a video that demonstrates how to submit an enhancement request for SolidWorks.
Thursday, January 26, 2012
A Green Street Machine? Foden Designs Use SolidWorks Sustainability to make the unheard of a Reality

Foden Designs are a contract manufacturer and custom designer of general and custom aftermarket automotive products. With an extensive background in manufacturing fasteners, shafts, drive systems and hose fittings for the automotive sector, Foden has taken this experience and knowledge to a new level and diversified their services to include many other industries. Foden also provides contract machining to the hydraulic, gas, mining, and construction sectors. Solidtec Solutions caught up with James Foden (Director) recently to talk about their use of SolidWorks Sustainability.
Foden Design Challenges
- Keeping design and manufacture to a budget
- Ensuring the design and manufacture are sustainable with minimal environmental impact
- Being able to design and manufacture within short time frames to meet customer demand
SolidWorks/Sustainability Design Solutions
- Flexibility in allowing rapid changes from one material/manufacturing technique to another
- Ability to analyse material changes and their impact on costs and sustainability in a matter of minutes
- Savings in both time and money
- Being able to measure environmental impact
- Working within client budget constraints
“Originally Foden Designs purchased SolidWorks Sustainability with a specific Automotive project in mind. We chose Solidtec Solutions as our provider because we felt we were working with the best provider of SolidWorks that best suited our needs, and their customer service is of the highest quality”
The Project - A Green Street Machine?
Client Brief: “I want to build a show car that really promotes my business”.
We don’t associate street machines and modified cars as being ‘green’, but this clients’ business is a sustainable building and construction company who have developed a specific green tick program that is government approved, allowing them to licence other companies in sustainability for their industry.
The client wanted to build a ‘green street machine’. James admitted that “straight away we knew we needed to have documentation to support our actions and decisions in building this car so we looked at our options, namely”;
- Outsourcing all of our projects to have someone else do the analysis
- Hiring a new staff member to do the research and analysis for the project or;
- Finding the software to allow our current designer to do the analysis internally
For James Foden the choice was easy. “Why outsource what we can do in house with the right resources? Why put on a new staff member that specialises in sustainability when the software is a far cheaper long term option”; which is why James made the decision to go with SolidWorks Sustainability.
“SolidWorks Sustainability allows us to select different materials and ways to manufacture new products on the fly. We also now have the ability to recycle, reuse and modify old parts, or to determine if are they’re better off left out of the project as they might have a bigger carbon impact then making new components in the long term”.
“In the end it always comes down to the end use of the product. So whilst we proved that some existing items would last the test of time, in some cases they might have been far too heavy, causing the vehicle to use excess fuel, tyres and brakes etc. So we felt if we could make a new part out of the right material we could in turn use a greener material that makes a lighter car”. Which is the innovative angle that James had to take to make a street machine turn green.
For Example: when Foden considered the wheels for the car, the new options vs. the original steel base line were:
Cast Aluminium 14.35kg
Billet 6061 Aluminium 14.3kg
Magnesium 9.04kg
Carbon 9.46kg
After the above comparisons were made, the total weight of the car in original factory spec and the target with the new manufactured components was analysed. The owner then took into consideration as to whether the reduced weight would actually positively affect critical factors such as fuel consumption and tyre wear etc. If the effect was enough to offset any new emissions caused by the manufacture of any new parts, then the new part could be incorporated in to the design. The final decision was to go with a new, light weight magnesium wheel.
The end result is a green fuelled car that has the street machine style, keeps its 70's look, but uses modern materials. “By doing so we were able to reduce the cars long term carbon footprint with respect to the expected lifecycle of the vehicle” says James.
Shane Preston, Solidtec CEO commented that “it’s great to see customers such as Foden Designs utilising SolidWorks products to solve their design challenges. It’s what the software was designed to do. The use of SolidWorks Sustainability for such an interesting project shows just how innovative our customers can be, and how the SolidWorks product range can compliment that innovation.”
James noted another benefit that Foden has experienced with SolidWorks Sustainability. “Since we originally bought SolidWorks Sustainability we have also found we have been able to offer our mining and industrial customers a service and choice which we did not previously have. Giving the customers an option of where and how they want the product made, based not just on cost, but environmental factors as well, is a very valuable capability”.
Tuesday, January 24, 2012
Solidtec Solutions announces increased value to Subscription customers with free Web Technical Training

Our new Solidtec Webtec technical web training courses are designed to enable our customers to get the most from their SolidWorks 3D CAD solution with a practical, hands on approach to training.
Solidtec Webtec will be free for all Solidtec Subscription Service customers in Australia and New Zealand and will be offered in the following categories:
SolidWorks Web Training
Solidtec delivers these monthly technical web training sessions to their Subscription customers to demonstrate how SolidWorks can solve design problems and to introduce new modelling and detailing techniques and methods. Attendees can interact live with the presenter and are encouraged to submit topics, problems and models that can be covered in case studies in future sessions. These sessions will be facilitated by Stewart Nankivel who has over 15 years’ experience in SolidWorks technical training.
Simulation Web Training
Simulation technical training sessions are aimed at existing Simulation users wanting to increase their knowledge and confidence in SolidWorks Simulation. This online training is interactive providing attendees an opportunity to ask questions and even submit problems and models to be covered in future sessions. With the introduction of this free monthly technical training, Solidtec Solutions will bring together the SolidWorks Simulation Community in Australia and New Zealand by providing a forum where users can interact and share their Simulation knowledge. These sessions will be facilitated by one of the few Certified Simulation Premium and Flow Simulation Professionals in ANZ, Solidtec's Elite Application Engineer and in-house Simulation expert, Damien Murphy.
“Solidtec Solutions is committed to adding value to our customers through initiatives such as Solidtec Webtec so they increase their profitability and innovation and benefit from the knowledge and experience of our technical experts and the ANZ SolidWorks community” said Gareth Hudson, Solidtec Solutions Technical Services Manager.
Wednesday, January 18, 2012
How to Upgrade your Solidworks installation
This is a guide for upgrading SolidWorks from one version to another - for example from SolidWorks 2011 to SolidWorks 2012. We highly recommend that you uninstall the old version completely, and then install the new version. This ensures you have a clean start with the new version.
To jump directly to the instructions, click here.
If you would like to run two major versions of SolidWorks (e.g. 2011 and 2012) alongside each other, click here.
It is not necessary to uninstall and reinstall between Service Packs, only major releases (i.e. each year). To learn how to update your SolidWorks version (e.g. go from SolidWorks 2012 SP1 to SP2) click here.
This is not intended to be a step-by-step installation guide and assumes some familiarity with basic computer maintenance, etc. If at any stage you are unsure of how to proceed, please contact your Solidtec Application Engineer.
The steps below are for standalone SolidWorks licenses. To check if you have a standalone license, from SolidWorks go to the Help menu. If you have the option to "Transfer license", you have a standalone license. If you have a network (SNL) license, most steps will be the same. If unsure, contact your Solidtec Application Engineer.
Contents
- Before you begin
- Uninstall the old version
- Install the new version
- After installation
- Further information
Before you begin
- Back up any local data. We recommend keeping a copy of your data in the old format should you need it. More information on backups can be found here.
- Make a note of any SolidWorks customisations, such as keyboard shortcuts. From SolidWorks >> (start a new Part if none are open) >> Tools >> Customize >> Keyboard tab >> check "Show only commands with shortcuts assigned" >> Copy List. This will copy the settings to the Windows Clipboard and you can then paste them into Excel or Notepad, etc. Although this requires you to re-input your keyboard shortcuts after reinstalling SolidWorks, there is no risk of "contaminating" the Registry settings. Do not use Copy Settings Wizard, as it copies the entire SolidWorks registry and can cause problems with the new version.
- Copy the SolidWorks Serial Number. From SolidWorks >> Help >> About SolidWorks. Make a note of the Serial Number (copy to Notepad or write it down on paper, etc.) - you may need to re-enter it during installation later on.
- Transfer the SolidWorks License off the machine. This ensures your license is available to use on another computer if anything happens during the uninstall/reinstall process. From SolidWorks >> Help >> Transfer License. If you are having trouble connecting to the SolidWorks License Server, make sure that internet traffic is allowed to/from https://activate.solidworks.com/
- Make sure you are logged in to Windows as an administrator. If you are unsure, see http://www.computerhope.com/issues/ch001093.htm
- Uninstall SolidWorks. Start Menu >> Control Panel >> Programs and Features (Add/remove programs in WinXP) >> SolidWorks >> Uninstall. The SolidWorks 2011 Installation Manager will start.
- If you are uninstalling SolidWorks 2011, right-click on the title-bar (up the top, where it says "SolidWorks 2011 Installation Manager") >> Total Uninstall >> proceed through the IM process (keep clicking Next).
- If you are uninstalling SolidWorks 2010 or earlier, please read the end of this post regarding how to clean your registry. It is important to do this to ensure the smooth opertation of the new version.
- Once uninstalled, reboot the computer.
- THIS IS A CRITICAL STEP! Disable any Anti-virus programs that are running as these can interfere with the installation process. Some Anti-virus programs are very difficult to disable – if in doubt Google for instructions “disable < Anti-virus Program Name>”.
If required, you can generally disable anti-virus programs manually:
- Start >> Run >> Control Panel >> Administrative Tools >> Services.
- Find all relevant anti-virus services >> RMB >> Stop
- Once installation is complete >> RMB >> Start
- Insert the SolidWorks Media Disc (make sure it is the correct bit version - 32 and 64-bit versions are supplied in the box). If the Installation Manager does not start automatically, browse to the media location in Windows Explorer and RMB on Setup.exe >> Run as administrator to begin installation.
- Run through the Installation Manager. If the Installation Manager detects the previous install, it may ask you to upgrade - this is fine, proceed as normal.
- Installation type is Individual.
- Enter the Serial Number if prompted (enter extra Serial Numbers if installing Simulation Premium or Flow Simulation).
- If you have SolidWorks Professional or Premium, click here to read about installing/upgrading the Toolbox.
- If you transferred the license off the computer previously, or there was no license on the machine, when starting up SolidWorks you will be asked to activate the product. Run through the process, using correct contact details (these will be associated with the Serial Number). If you are unable to activate, use the 30-day Trial Activation. This will give you access to SolidWorks Premium for 30 days regardless of what version of SolidWorks you are entitled to. If this happens please notify your Solidtec Application Engineer
- Make sure that the File Locations are set up correctly if using a central file server. From within SolidWorks >> Options >> System Options tab >> File Locations. The most common locations to change are: Document Templates, Sheet Formats, Weldment Profiles and Custom Properties. To add a Custom Properties location you may need to delete the existing location first (SolidWorks can only handle one location for the Custom Properties file).
- Apply any customisations, such as keyboard shortcuts, toolbar layouts, etc. Back these settings up using the Copy Settings Wizard.
- Consider creating a Disc Image of your HDD, to allow for quick restoration to a known clean install state. Click here to read more.
- If you have SolidWorks Professional or Premium with the Toolbox add-in, the correct method to update the Toolbox data is as follows:
- Browse to your existing (e.g. 2011) Toolbox data folder - by default this is in C:\SolidWorks Data.
- Copy the folder and its contents - rename the copied folder something like "SolidWorks Data 2012". Make another copy of the orignal folder and keep it with the rest of your backed up SW2011 data.
- During installation, on the Summary page under Toolbox Options >> Change. Choose to "Upgrade an existing Toolbox location" and browse to the "SolidWorks Data 2012" folder. Continue the installation process.
- This will upgrade the contents of the new folder, leaving the previous folder intact if you wish to continue using SolidWorks 2011. If you do not need the 2011 data anymore, you can delete the orignal "SolidWorks Data" folder.
- If you have already installed SolidWorks and need to change the location of the Toolbox from the default local installation path to a file server path, from within SolidWorks >> Options >> System Options tab >> Hole Wizard/Toolbox >> Browse to the correct location.
Uninstall the old version
Install the new version
After installation
Setup
Toolbox installations
Further information
Further information on installing SolidWorks can be found here:
- SolidWorks Installation and Admin Guide – the official Admin guide.
- How to ensure a clean uninstall and update of SolidWorks – a more involved method of preparing your machine for a clean SolidWorks installation.
Tuesday, January 10, 2012
How to install Multiple SolidWorks versions on one Computer
The method used will help keep the file references between the two versions apart.
Thursday, December 1, 2011
How to Activate and Transfer a SolidWorks Stand-alone license
This video explains how to activate and transfer a SolidWorks stand-alone license over the internet.
Tuesday, November 22, 2011
Part number generator macro for Solidworks
Tuesday, November 8, 2011
Hole Table Padding - Adjusting beyond the standard limits
When adding Hole Tables to drawings the table often extends, vertically, beyond the limits or boundaries of the specified sheet size (see Pic_1). You may have tried to adjust the table font size and zeroed the Vertical Cell Padding dial to rectify this, but noticed that even though the padding dial is zeroed, there is still an amount of padding that remains around the text. This remaining padding takes up valuable space, let's see how we can reduce/shrink this cell padding to tightly hug the cell boundary.
Pic_1: The Problem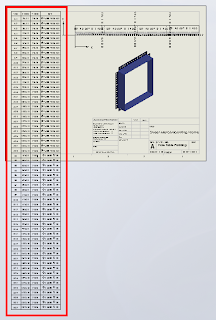
Before we continue, remember that we can only fit so much on to a single sheet before it becomes unreadable, so there is obvioulsy a limit to how many rows you will be able to fit vertically on a specific sheet size.
Click anywhere in the table to activate its properties. You will see this dialogue appear above the table:

Note where the adjustment settings are for Font Size and Vertical Cell Padding. We'll get back to that in a second.
Next, click on the number 2 to select the entire row. Hold down the Shift key and select the last row in your table (I had sixty rows all up in this example). You should now have all rows except the heading row selected. With all rows selected you can change your font size; I have used 9, which is still quite readable and then we want to adjust the Vertical Cell Padding.
You will note though, that when you dial down (using the up-down arrow toggles) you will be stopped at zero. Naturally you will think this to be the limit, but alas, we know with Solidworks anything is possible. Simply select the Vertical Cell Padding field as below...

And while we are at it, quickly click anywhere in the table, then click the black cross to the left of Column A to activate the table properties dialogue, which will appear to the left of your screen. We want to tidy things up a little before printing. In the properties dialogue select "Combine same sizes" and you will get this:

In the properties dialogue, click the green check mark to close and we're done.
You should now have your table fitting nicely onto your drawing sheet and looking much better than when we started.

Have a play with those settings and I hope that this has helped you somewhat to tidy up those Hole Tables.
Pic_1: The Problem

Before we continue, remember that we can only fit so much on to a single sheet before it becomes unreadable, so there is obvioulsy a limit to how many rows you will be able to fit vertically on a specific sheet size.
Click anywhere in the table to activate its properties. You will see this dialogue appear above the table:

Note where the adjustment settings are for Font Size and Vertical Cell Padding. We'll get back to that in a second.
Next, click on the number 2 to select the entire row. Hold down the Shift key and select the last row in your table (I had sixty rows all up in this example). You should now have all rows except the heading row selected. With all rows selected you can change your font size; I have used 9, which is still quite readable and then we want to adjust the Vertical Cell Padding.
You will note though, that when you dial down (using the up-down arrow toggles) you will be stopped at zero. Naturally you will think this to be the limit, but alas, we know with Solidworks anything is possible. Simply select the Vertical Cell Padding field as below...

Type negative 1.8 i.e. -1.8 and hit the Enter key on your keyboard. You should now be looking something like this in the settings dialogue...


and your cell text will be hugging the cell borders all nice and cosy, like this:


And while we are at it, quickly click anywhere in the table, then click the black cross to the left of Column A to activate the table properties dialogue, which will appear to the left of your screen. We want to tidy things up a little before printing. In the properties dialogue select "Combine same sizes" and you will get this:

In the properties dialogue, click the green check mark to close and we're done.
You should now have your table fitting nicely onto your drawing sheet and looking much better than when we started.

Have a play with those settings and I hope that this has helped you somewhat to tidy up those Hole Tables.
Tuesday, October 11, 2011
How to place a point at the Center of Mass
How to place a point at the Center of Mass of a solid and add reference planes through the point so that they update as the solid changes.
Sunday, August 7, 2011
Solidtec Solutions Help REYN Consultants Save Design Time

REYN Consultancy is a Mechanical Engineering Consultancy that provides new mechanical services to overcome dysfunctional products and turn efficient ideas into a working reality in aid of achieving higher profits by cutting down on time consuming activities.
What REYN Consultancy does:
· 3D Product Design & Analysis
· Stress Analysis (FEA) & Certification
· Realistic Prototyping & Presentation
· Mechanical Failure Solutions
· R&D (Research and Development)
· Product Manufacture Management
· 3D Mechanical & Structural Design (including Manufacturing Drawings)
Accelerated CAD features:
· Mechanical Component Design
· Sheet Metal Design
· Cable and Harness Design
· Tube, Pipe and Flexible Hose Design
· Stress Analysis (FEA)
· Dynamic Simulation
· Tooling and Mold Design
Extra Services organized on Client's request:
· Plotted full size Manufacturing Drawings
· 3D Printing
· Help with Patenting
REYN Consultancy uses SolidWorks Professional 2011, supplied and supported by Solidtec Solutions, as their preferred design software. REYN has been using SolidWorks for around 12 months.
When asked why REYN chose to use SolidWorks, Daniel Reynolds, Principal Consultant said “Simply put, its ease-of-use. It’s very user friendly. SolidWorks has simplistic commands and easy to follow tutorials. I also like the structural members functionality as many members can be created as one part within SolidWorks, something that other CAD programs cannot do”.
Daniel also stated that with the right support and training “work is done in a much more efficient way, saving us time, and helping our bottom line”
“The reason we chose Solidtec Solutions as our SolidWorks provider was due to the personal way in which they attend to our requests. When looking for CAD software providers, they were the most helpful and they got back to us faster than anyone else” admitted Mr Reynolds. “Not only did they get to us quickly when evaluating a CAD system, but now that we’re a customer and signed up to their subscription services, it must be said that their response time for tech support is outstanding”.
For more information on REYN Consultancy visit http://www.reyn.com.au
Tuesday, July 5, 2011
SolidWorks Simplify Tool
The SolidWorks Simplify tool is used to generate simplified configurations of sub-assemblies, to then be used on top level assemblies to help improve performance.
For more SolidWorks tips & tricks, please visit the Solidtec Blog.
http://solidtecsolutions.blogspot.com/
For more SolidWorks tips & tricks, please visit the Solidtec Blog.
http://solidtecsolutions.blogspot.com/
Wednesday, June 29, 2011
How to model a Fancy Tube in SolidWorks.
How to use SolidWorks to create a fancy tube that spirals around an odd shape former.
Thursday, June 23, 2011
Solidworks Mass Properties And Solid Body's
When designing with the intent to determine the mass of your part be careful when your part has solid body's...this can sometimes cause undersirable results...
Subscribe to:
Posts (Atom)
Hot Posts

Hot Car Girl
